
 Betuweroute en Kunst
 Kunst in huis? Netty Franssen maakt ook bijzonder mooie dingen
Install Lasso 8 ProfessionalSet up an Xserve from scratch part IV / Install Lasso 8 |
I build web sites based on the Lasso / MySQL combination for our company. It is by far the easiest way to connect a database to the web and it has the best performance. Lasso comes in a developer, which is free but limited, and an unlimited paid version. The default installation is always the developer version. Just by entering a serial number you convert the developer version to the unlimited version. So give it a try, you'll love it.
Tweet

1. Install Lasso 8 Professional on Mac OS X 10.9 and lower
1. Start
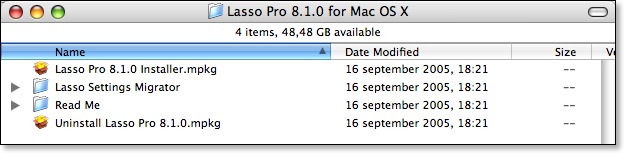
2. If the Xserve is connected to the internet, go to Lassosoft and download the latest version there. Otherwise, copy the Lasso installer packages from your computer to the Xserve by connecting to it through AFP or by burning it on CD and then insert the CD in the Xserve.
3. Double click the installer and install 'Lasso for Apache'. Accept the defaults.
When the installation is through, Safari should have started and presents the initialization screen for Lasso Server Admin.
4. Enter all required data and get the default site running. The default site in Lasso means that the default Apache web server connects to the default site in Lasso. If you run more domains on the Xserve, you can create a Lasso site for each domain, so they do not interfere with each other. See the manual for more details.
5. Open a new tab or new window in your web browser and navigate to http://127.0.0.1/ServerAdmin.lassoapp and login with the information you provided in step 4.
You're done. Lasso is running and you can start programming. If you want to send email with Lasso, see the manual for the various options.
We continue by installing a Subversion server.
2. Install Lasso 8 Professional on Mac OS X 10.10 El Capitan and higher
1. Download and install the following products:
- The legacy Java 6 runtime for OS X.
- X11 for Mac.
- the latest Lasso 8 installer.
2. Open the Terminal app and check if you have this folder: /usr/local/libexec
$ ls -l /usr/local/libexec/apache2
total 792
-rwxr-xr-x 1 root wheel 117008 11 okt 2015 Lasso8ConnectorforApache2.2.so
-rwxr-xr-x 1 root wheel 142468 11 okt 2015 Lasso8ConnectorforApache2.4.so
-rwxr-xr-x 1 root wheel 44416 24 mrt 19:55 mod_lasso9-2.4.so
-rwxr-xr-x 1 root wheel 34252 11 okt 2015 mod_lasso9.10.10.so
-rwxr-xr-x 1 root wheel 58428 11 okt 2015 mod_lasso9.so
3. If not, create it.
$ sudo mkdir /usr/local/libexec
$ sudo mkdir /usr/local/libexec/apache2
Download Lasso8ConnectorforApache2.4.so.zip and copy the file Lasso8ConnectorforApache2.4.so into that folder.
4. Look in /etc/apache2/httpd.conf (Mac OS X client) or /Library/Server/web/config/apache2/httpd_server_app.conf (Mac OS X Server) and check the end of that file. It should have the following 3 lines:
$ tail /etc/apache2/httpd.conf
#Begin: Added by Lasso 8.6 installer
Include /private/etc/apache2/users/lasso8.conf
#End: Added by Lasso 8.6 installer
if not, add them yourself.
And also add index.lasso to the DirectoryIndex-statement.
5. Next, edit file /etc/apache2/users/lasso8.conf and look at the LoadModule-line. It should look like this:
LoadModule lasso8_module /usr/local/libexec/apache2/Lasso8ConnectorforApache2.2.so
Change the Lasso8ConnectorforApache2.2.so into Lasso8ConnectorforApache2.4.so
6. Since Mac OS 10.10 you need a LaunchDaemon plist for Lasso 8 to start when OS X starts.
Enter the following commands in Terminal to create one:
$ sudo vi /Library/LaunchDaemons/com.lassosoft.lasso8.plist
<?xml version="1.0" encoding="UTF-8"?>
<!DOCTYPE plist PUBLIC "-//Apple//DTD PLIST 1.0//EN" "http://www.apple.com/DTDs/PropertyList-1.0.dtd">
<plist version="1.0">
   <dict>
     <key>RunAtLoad</key>
     <true/>
     <key>Label</key>
     <string>com.lassosoft.lasso8</string>
     <key>ProgramArguments</key>
     <array>
       <string>/Applications/Lasso Professional 8/LassoAdmin/Lasso8Service.sh</string>
     </array>
   </dict>
</plist>
Hit the ESC-key, type :w! to save and then :q to exit vi. Then change the ownership and set the correct permissions:
$ sudo chown root:wheel /Library/LaunchDaemons/com.lassosoft.lasso8.plist
$ sudo chmod 644 /Library/LaunchDaemons/com.lassosoft.lasso8.plist
$ sudo launchctl load -w /Library/LaunchDaemons/com.lassosoft.lasso8.plist
You can now check if Lasso 8 is running. A restart of Mac OS X might be required.
3. Copy Lasso 8 Settings from a Previous or Other Lasso 8 Server
I am going to show how to import settings from another server into this new installation. This is handy if you need the same setup. To be able to import these settings, you first must allow uploads in Lasso.
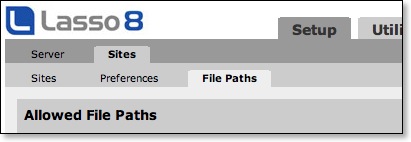
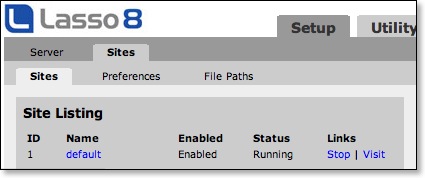
1. Click the 'Sites' tab and then the 'File paths' tab.
2. Let Lasso determine the upload directory by uploading a file. Just pick a small text file.
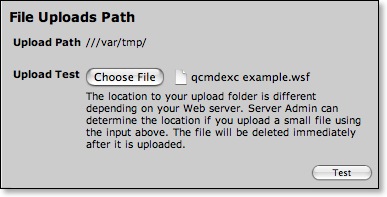
Click 'Test'
3. If the upload path is not added automatically, copy the path next to 'Upload Path' into the 'Add Path' field and only click 'Allow File Uploads'. Do not click 'Add Path'.
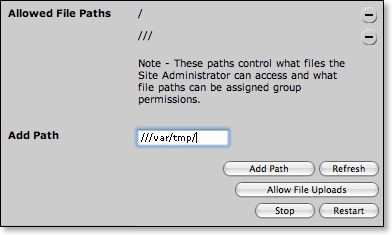
The path will be added and the 'Allow File Uploads' button dissapears.
4. Click the 'Sites' tab and click the 'Visit' link.
OR navigate to http://(ip-of-xserve)/SiteAdmin.lassoapp and enter the Site Administrators username and password.
5. Click the 'Setup' tab; click the 'Sites' tab; click the 'Import/Export' tab.
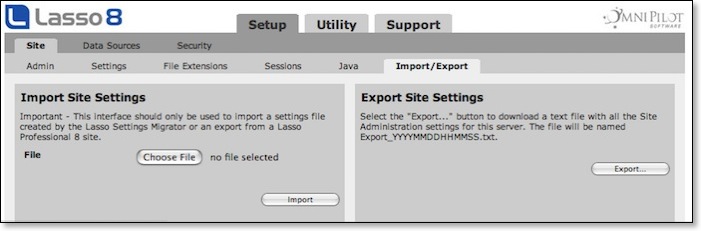
6. In the 'Import Site Settings' pane, click the 'Choose File' button and pick the file with the settings you exported from the other server. Click the 'Import' button.
Note that when you used a different username and password for the new site as for the old site, by importing the settings file, the username and password are also overwritten.
Things to take care of after importing are File Paths permissions, Mail server settings and Scheduled Events of which parts or paths may be different or not needed on the new server.
Now that Lasso is installed, we continue by installing a Subversion server.