
 Betuweroute en Kunst
 Kunst in huis? Netty Franssen maakt ook bijzonder mooie dingen
Install multiple MySQL instancesOn Mac OS X Client and Server |  |
1.
IntroductionWe searched for an easy method to create as many individually running MySQL instances on one computer as we want. Each instance should have its own data directory so we can separate loads across multiple mysqld daemons and set up replication for different servers onto one server. So we came up with this. We did set this up on Mac OS X, but the instructions for the manual installation of MySQL should be portable, with minor changes, to other UNIX and Linux distributions (--> Instructions on how to install MySQL manually).
Tweet

To identify a second instance, we chose to use a 2 as the suffix for configuration files and such and we will be running it over port 3307 (the default port of MySQL is 3306).
Before you start, open Terminal and log in as root. If you cannot log in as root, you must use the sudo-command in front of almost every terminal command.
We describe two installation types:
- for a client Mac, like an iMac at home or at work, where you install MySQL manually.
- for a server Mac, like an Xserve or a Mac Mini Server, where you just switch MySQL on via Server Admin.
The other chapters have subsections for each type of installation.
2.
Getting started (manual MySQL installation)Database directory
MySQL uses a data directory to store all files and databases in, /usr/local/mysql/data/. We need one too, so we create /usr/local/mysql2/data/.
$ cd /usr/local
$ mkdir mysql2
$ mkdir mysql2/data
Configuration
MySQL uses a config file, /etc/my.cnf. We need one too for the new instance, so we copy the default one and we name it /etc/my2.cnf.
$ cp /etc/my.cnf /etc/my2.cnf
Edit the file and change, or add, the following options:
port=3307
socket=/tmp/mysql2.sock
datadir=/usr/local/mysql2/data
pid-file=/usr/local/mysql2/data/<unique name of PID file>
You can find the correct name of the PID-file in the default MySQL installation directory:
$ ls -l /usr/local/mysql/data/*.pid
-rw-rw---- 1 _mysql wheel 4 5 sep 13:05 IMAC2010.local.pid
Save the configuration file.
Startup script
On Max OS X, to start MySQL when your Mac starts, you must install the StartupItem and the System Preferences Pane that come with the download. When the startup item is installed, you will find it here:
$ ls -ld /library/startupitems/MySQL*
drwxr-xr-x 4 root wheel 136 9 sep 2009 /library/startupitems/MySQLCOM
As you can see, this is a directory. To configure the startup of the second instance, duplicate the MySQLCOM directory:
$ cd /library/startupitems
$ cp -R MySQLCOM MySQL2COM
$ cd mysql2com
$ mv MySQLCOM MySQL2COM
Edit the MySQL2COM file (it is a script file) and change the following:
Change
# /Library/StartupItems/MySQLCOM/MySQLCOM
into
# /Library/StartupItems/MySQL2COM/MySQL2COM
Change
# A script to automatically start up MySQL on system bootup
into
# A script to automatically start up a second instance of MySQL on system bootup
Change
# The path to the mysql.server init script. The official MySQL
into
# The path to the mysql2.server init script. The official MySQL
Change
SCRIPT="/usr/local/mysql/support-files/mysql.server"
into
SCRIPT="/usr/local/mysql/support-files/mysql2.server"
Change
ConsoleMessage "Starting MySQL database server"
into
ConsoleMessage "Starting instance 2 of MySQL database server"
Change
ConsoleMessage "Stopping MySQL database server"
into
ConsoleMessage "Stopping instance 2 of MySQL database server"
Change
ConsoleMessage "Restarting MySQL database server"
into
ConsoleMessage "Restarting instance 2 of MySQL database server"
Change
ConsoleMessage "Could not find MySQL startup script!"
into
ConsoleMessage "Could not find instance 2 of MySQL startup script!"
and save the file.
Start/Stop script
MySQL uses a startup-script to start or stop its deamon, /usr/local/mysql/support-files/mysql.server. We need one too, so we copy the default one and name it /usr/local/mysql/support-files/mysql2.server.
$ cd /usr/local/mysql/support-files/
$ cp mysql.server mysql2.server
Edit this script and change / add the following:
datadir=/usr/local/mysql2/data
...
...
if test -z "$datadir"
then
datadir=/usr/local/mysql2/data
fi
...
...
$bindir/mysqld_safe --defaults-file=/etc/my2.cnf --datadir=$datadir --pid-file=$server_pid_file $other_args >/dev/null 2>&1 &
and save the file. Read on in chapter 4. Initialization
3. Getting started (Mac OS X Server installation)
Database directory
MySQL uses a data directory to store all files and databases in, /var/mysql/. We need one too, so we create /var/mysql2/.
$ cd /var
$ mkdir mysql2
Configuration
MySQL uses a config file, /etc/my.cnf. We need one too for the new instance, so we copy the default one and we name it /etc/my2.cnf.
$ cp /etc/my.cnf /etc/my2.cnf
Edit the file and change, or add, the following options:
port=3307
socket=/var/mysql2/mysql.sock
datadir=/var/mysql2
pid-file=/var/mysql2/<name of PID file>
You can find the correct name of the PID-file in the default MySQL installation directory:
$ ls -l /var/mysql/*.pid
-rw-rw---- 1 _mysql admin 3 Sep 3 18:48 FCSPR1.private.pid
Save the configuration file.
Startup script
On Max OS X Server, the MySQL installation is started via launchd. Therefore we must create a launchd parameter list file to start the second instance of MySQL automatically when the computer starts. We can simply copy the one installed by Mac OS X Server to the correct folder and modify its contents.
$ ls /system/library/launchdaemons/*mysql*
/system/library/launchdaemons/org.mysql.mysqld.plist
$ cd /library/launchdaemons
$ cp /system/library/launchdaemons/org.mysql.mysqld.plist ./org.mysql.mysqld2.plist
Edit the new file and change its contents to:
<?xml version="1.0" encoding="UTF-8"?>
<!DOCTYPE plist PUBLIC "-//Apple//DTD PLIST 1.0//EN" "http://www.apple.com/DTDs/PropertyList-1.0.dtd">
<plist version="1.0">
<dict>
<key>Label</key>
<string>org.mysql.mysqld2</string>
<key>OnDemand</key>
<false/>
<key>ProgramArguments</key>
<array>
<string>/usr/libexec/mysqld</string>
<string>--defaults-file=/etc/my2.cnf</string>
<string>--user=mysql</string>
<string>--port=3307</string>
</array>
<key>ServiceIPC</key>
<false/>
</dict>
</plist>
and save the file.
Start/Stop script
On Mac OS X Server, there is no such thing. You must use launchctl to load (=start) or unload (=stop) the server instances. This is described in Chapter 5.
4. Initialization
Before we can do anything, we need to initialize the default database directory.
Manual MySQL installation
$ cd /usr/local/mysql
$ ./scripts/mysql_install_db --datadir=/usr/local/mysql2/data
Check and note the ownership of the original mysql data directory:
$ ls -ld ../mysql/data
drwxr-x--- 39 _mysql wheel 1326 5 sep 13:05 ../mysql/data
Set the owner and permissions accordingly for the new data directory:
$ chown -R mysql:wheel data
Mac OS X Server installation
$ cd /usr/bin
$ ./mysql_install_db --datadir=/var/mysql2
$ cd /var
Check and note the ownership of the original mysql data directory:
$ ls -ld mysql
drwxr-xr-x 35 _mysql admin 1190 Sep 5 14:58 mysql
Set the owner and permissions accordingly for the new data directory:
$ chown -R mysql:admin mysql2
5. Start [or stop] the server instance
Now that everything is copied, edited and initialized, you should be able to start the server instance.
Manual MySQL installation
To start the server:
$ /library/startupitems/mysql2com/mysql2com start
To stop the server:
$ /library/startupitems/mysql2com/mysql2com stop
Mac OS X Server installation
To start the server:
$ launchctl load /library/launchdaemons/org.mysql.mysqld2.plist
To stop the server:
$ launchctl unload /library/launchdaemons/org.mysql.mysqld2.plist
If you try to stop the server with a modified mysql2.server script, launchd restarts the killed process immediately. So trying that is of no use.
6. Manage the multiple instances with MySQL Workbench
There are many MySQL clients out there to manage MySQL databases with, but the one to use first is the one from MySQL: MySQL Workbench. MySQL Workbench (MW) can be used to visually edit the config files while no mysqld instances are running. Of course you can do that too with vi from the terminal, but then you need to know by heart all possible options and what exactly they mean. With MW, you get a small explanation with each option and even a tooltip when you hoiver them with some more info. Also with MW, you can start and stop configured instances, check their status, etc..
This software can be downloaded from MySQL's website: http://dev.mysql.com/downloads/workbench/
A good tutorial on how to use MySQL Workbench at MySQL : https://dev.mysql.com/doc/workbench/en/
Manual MySQL installation
Default instance configuration
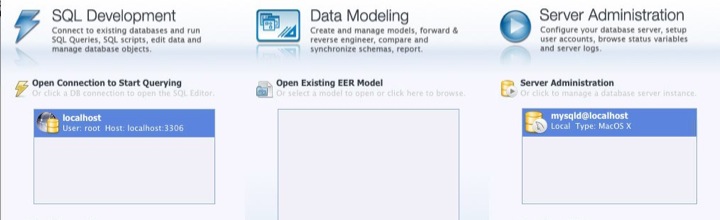
When MW starts for the first time, you see three empty columns. You have to start by adding entries to the third one. To add the default MySQL server instance, click 'New Server Instance'. Since I created the instances on the same machine I run MW on, I select localhost:

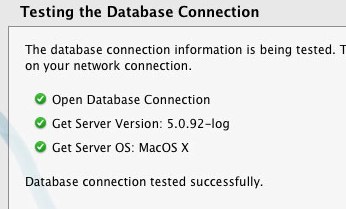
Click Continue. On the next screen, leave the defaults (supposing you kept root as a user) and click Continue. Enter the password and click Continue. The next screen should at least mark Open Database connection as successful.

Click Continue. Leave both selections as they are and click Continue.
On the next screen, everything should check out ok. Click Continue.
On the Review settings-dialog, click I'd like to review the settings again.
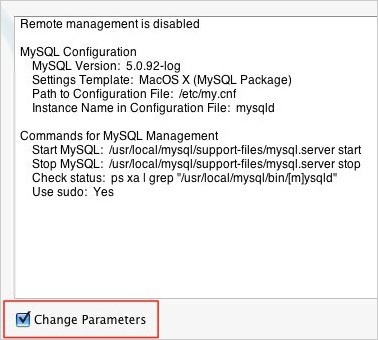
On the next screen, you see a summary. As you know by now, the start and stop commands are ok, but the status check is not.
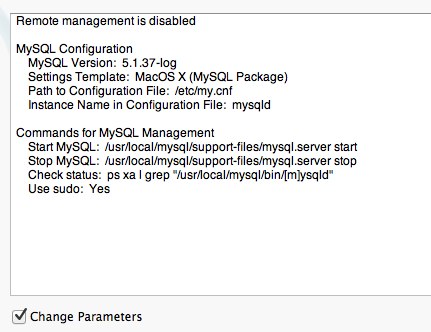
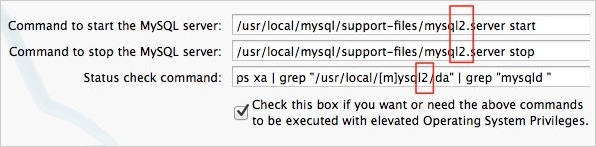
Check Change Parameters and click Continue.
On the next screen, leave everything as is and click Continue. Then change the Status check command to this:

The Status check command must be changed, otherwise it would always resolve to true, because this path is true for every instance of the daemon. Here is a demonstration of getting from may lines to only the one we need:
$ ps xa | grep "/usr/local/mysql/bin/[m]ysqld"
40024 ?? S 0:00.70 /usr/local/mysql/bin/mysqld --basedir=/usr/local/mysql --datadir=/usr/local/mysql/data --user=mysql --log-error=/usr/local/mysql/data/imac2008.fritz.box.err --pid-file=/usr/local/mysql/data/imac2008.fritz.box.pid
A unique difference between multiple instances is the data directory, so we should better filter on that:
$ ps xa | grep "/usr/local/[m]ysql/da"
39938 ?? S 0:00.02 /bin/sh ./bin/mysqld_safe --datadir=/usr/local/mysql/data --pid-file=/usr/local/mysql/data/imac2008.fritz.box.pid
40024 ?? S 0:00.72 /usr/local/mysql/bin/mysqld --basedir=/usr/local/mysql --datadir=/usr/local/mysql/data --user=mysql --log-error=/usr/local/mysql/data/imac2008.fritz.box.err --pid-file=/usr/local/mysql/data/imac2008.fritz.box.pid
But now I also get mysqld_safe listed, so I add an extra filter (note the space after the word mysqld):
$ ps xa | grep "/usr/local/[m]ysql/da" | grep "mysqld "
40024 ?? S 0:00.74 /usr/local/mysql/bin/mysqld --basedir=/usr/local/mysql --datadir=/usr/local/mysql/data --user=mysql --log-error=/usr/local/mysql/data/imac2008.fritz.box.err --pid-file=/usr/local/mysql/data/imac2008.fritz.box.pid
The square brackets around the m mean that grep should match m or M and also prevent grep from listing the ps command itself, otherwise the test would also always be true, because the status check does not actually check if MySQL is running; it just checks if there is some output returned, which can be anything.
Click Continue and give this configuration a name. I tend to leave it as it is. Click Finish.
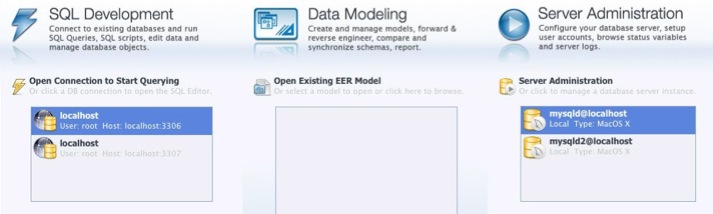
This first instance is now listed in column 1 and column 3:

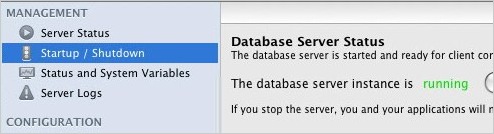
To check the status and view options, double-click on the server instance under Server Administration. Under Startup / Shutdown, it should now say Running.

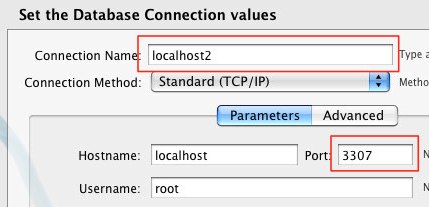
Second instance configuration
Click on New Server Instance in the main MW-window. Again, leave localhost selected.
In the next window, change the Connection Name and the Port values:
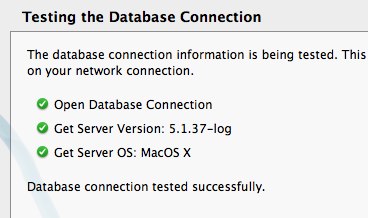
Click Continue. Since the default for a new MySQL instance is a user root with no password, you were not asked for a password. How setup a fresh instance is described here. The next screen should at least mark Open Database connection as successful.
Click Continue. Leave both selections as they are and click Continue. Again, the tests should all be ok.
On the Review settings-dialog, click I'd like to review the settings again.
On the next screen, you see the summary again. Check Change Parameters and click Continue.
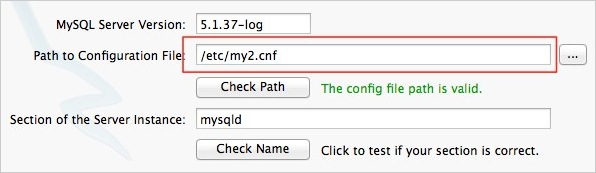
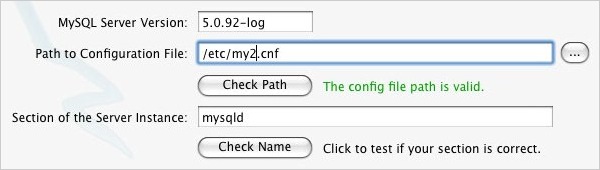
Now, change the Path to Configuration File into /etc/my2.cnf and click Check Path.
Click Continue. You get a screen with empty fields. Enter following data with paths that match your installation:
Click Continue and name this configuration something like mysqld2@localhost. Click Finish.
If the new server instance does not show up under Server Administration, just restart MW. It is a bug in MW.
To check the status and view options, double-click on the second server instance under Server Administration. Under Startup / Shutdown, it should now say Running.

Now you can connect to the instances with any other MySQL client, like for example Navicat or RazorSQL.
Mac OS X Server installation
Default instance configuration
When MW starts for the first time, you see three empty columns. You have to start by adding entries to the third one. To add the default MySQL server instance, click 'New Server Instance'. Since I created the instances on the same machine I run MW on, I select localhost:

Click Continue. On the next screen, leave the defaults (supposing you kept root as a user) and click Continue. Enter the password and click Continue. The next screen should at least mark Open Database connection as successful.

Click Continue. Leave both selections as they are and click Continue.
On the next screen, you will get errors. This is because MW does not recognize the installation and defaults to its own known values. Simply click Continue, we shall modify these values so everything will work as expected.
On the next screen, you see a summary. As you know by now, the start and stop commands are wrong for Mac OS X Server.
Check Change Parameters and click Continue.
On the next screen, leave everything as is and click Continue. Then it gets interesting. Change the defaults to this:
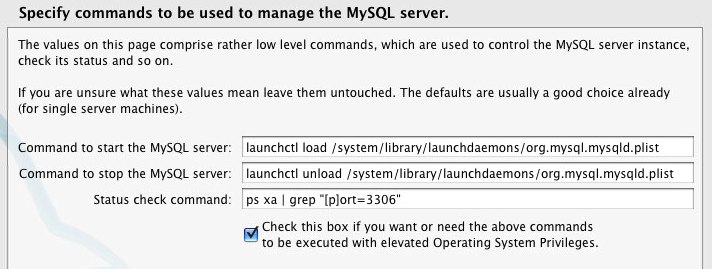
The Status check command needs to be changed, otherwise it would always resolve to false, because the daemon is not run from the default directory. And if we would change the path into /usr/libexec, the test would always resolve to true, as long as there is at least 1 instance running, whether it is the first, second, or n-th one. Simply because they all use /usr/libexec/mysqld:
$ ps xa | grep "/usr/libexec/[m]ysqld"
76 ?? Ss 0:36.63 /usr/libexec/mysqld --socket=/var/mysql/mysql.sock --user=mysql --port=3306 ...etc
20231 ?? Ss 0:02.41 /usr/libexec/mysqld --defaults-file=/etc/my2.cnf --user=mysql --port=3307
As you can see, the --port parameter is unique among instances, so that is why I use that one to grep on:
$ ps xa | grep "[p]ort=3306"
76 ?? Ss 0:36.59 /usr/libexec/mysqld --socket=/var/mysql/mysql.sock --user=mysql --port=3306 ...etc
The square brackets around the p mean that grep should match p or P and also prevent grep from listing the ps command itself, otherwise the test would also always be true, because the status check does not actually check if MySQL is running; it just checks if there is some output returned, which can be anything.
Click Continue and give this configuration a name. I tend to leave it as it is. Click Finish.
This first instance is now listed in column 1 and column 3:
To check the status and view options, double-click on the server instance under Server Administration. Under Startup / Shutdown, it should now say Running.
Second instance configuration
With the configuration of the second instance you should take care, otherwise it ends up using the same directory as the default instance; which is not good! So before you try anything, make sure you have gone through all the steps described below.
Click on New Server Instance in the main MW-window. Again, leave localhost selected.
In the next window, change the Connection Name and the Port values:

Click Continue. Since the default for a new MySQL instance is a user root with no password, you were not asked for a password. How setup a fresh instance is described here. The next screen should at least mark Open Database connection as successful.
Click Continue. Leave both selections as they are and click Continue.
Now we get the usual errors. Simply click Continue. Again, check Change Parameters and click Continue.
Now, change the Path to Configuration File into /etc/my2.cnf and click Check Path.
Click Continue. On the next screen, enter the start and stop commands as shown below:
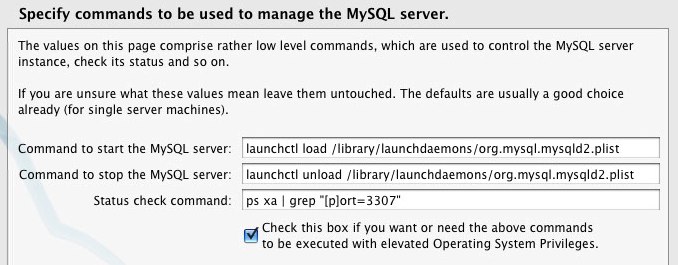
Notice that these are the paths to the plist-file we created for the second instance and that the grep-command now checks for the text port=3307 or Port=3307.
Click Continue. Give the server instance a name, different from other instances. We named ours mysqld2@localhost. Then click Finish.
If the new server instance does not show up under Server Administration, just restart MW. It is a bug in MW.

To check whether everything is configured correctly, double-click the second server instance.
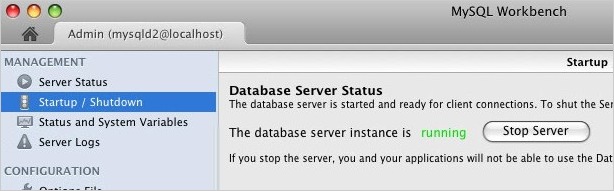
Try stopping and starting the server. When asked for a password, enter your account password, not a MySQL-user password.
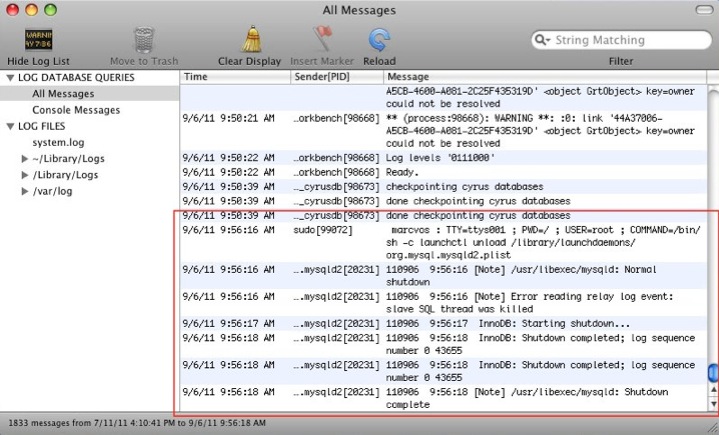
You can follow what is happening in Console, under All Messages:
Now you can connect to the instances with any other MySQL client, like for example Navicat or RazorSQL.