
 Betuweroute en Kunst
 Kunst in huis? Netty Franssen maakt ook bijzonder mooie dingen
Setup MySQL ReplicationOn Mac OS X Server |  |
1.
IntroductionWe setup two MySQL instances for use as slaves for one master. Read this on how to setup multiple MySQL instances. The workflow presented below is for one slave instance, but is the same for every instance - only the config file and port are different. We divided all the databases into two groups, those that belong together and those that are independent. Each slave replicates one group.
Tweet

Let’s start!
2. Stop all interfering processes
Stop as much interfaces as possible that modify data in the MySQL databases you are going to replicate: external servers, JDBC applications, Lasso, PHP, etc..
Make a note of every service you shut down so you will not forget to turn it back on again afterwards.
3. Setup the Master
3.1 MySQL Workbench
This software can be downloaded from MySQL's website: http://dev.mysql.com/downloads/workbench/
A good tutorial on how to use MySQL Workbench at MySQL : https://dev.mysql.com/doc/workbench/en/
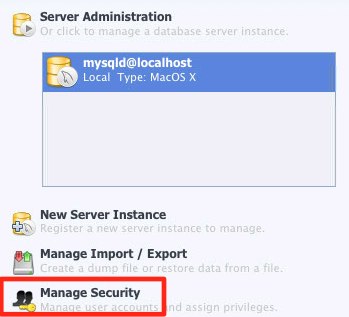
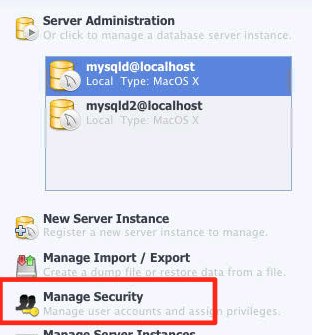
Start a remote desktop session with the remote server and start MySQL Workbench. Click Manage Security in the bottom right corner:
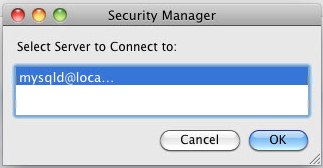
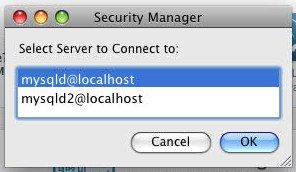
and select the server instance you are going to use as the master, which is probably localhost, because you cannot use MySQL Workbench to edit a configuration file on a remote server:
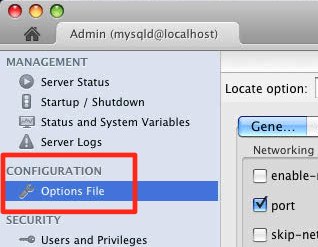
Click Options File under the Configuration-section in the side bar:

Note:
With each option, I also show you which option it is that is added to /etc/my.cnf.
You can of course skip using MySQL Workbench and type the options directly into /etc/my.cnf.
In that case, note the hyphens and underscores used in the names of the MySQL options.
Server ID
Select the Replication-pane and choose a unique Server ID. The ID is needed by the replication server instance. The ID must be a number between 1 and whatever. In our setup we used the number 14.
/etc/my.cnf : server-id = 14 (link )
Binary Log
The only way a slave can replicate what is happening on the master, is to read out the log file on the master. This log file is the binary log, which is switched off by default.Select the Log Files-pane. Check the log-bin option and enter the name for the log file. Name it mysql-bin or so:
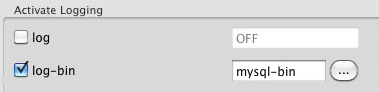
/etc/my.cnf : log-bin = mysql-bin (link )
Binary Log Expiration
A bit upwards, under 'Advanced Log Options', is another option to switch on: Expire Log Days. This option makes MySQL delete older bin-log files.I set it to 30 days. If I would choose a shorter period, it could mean that when the slave fails while I am on vacation and are unable to repair the situation in due time, I have to start all over again, because the bin-logs I would need are purged!
/etc/my.cnf : expire_log_days = 30 (link )
Concurrent Insert
Another option for the master is concurrent_insert. Select the MyISAM-pane and set its value to 2 - ALWAYS./etc/my.cnf : concurrent_insert = ALWAYS (link )
Selecting or omitting specific databases
Per default, all databases are logged in the bin-log. If you want just one or just a few, you can use the binlog-do-db option to specify which database should be logged. (link )If, on the other hand, you want to most databases but not all, you can use the option binlog-ignore-db to specify the database that should not be logged. (link )
With both options, you can specify only 1 database per option.
Simply repeat each option on a new line to specify more databases.
/etc/my.cnf :
binlog-do-db = database1
. . .
binlog-do-db = databaseX
Other settings that need your attention
/etc/my.cnf : binlog-format = ROW (link )/etc/my.cnf : sync_binlog = 5 (link )
Apply all changes and close MySQL Workbench. Restart the MySQL instance.
From now on I used Navicat and Terminal, all on the hosting server itself, to manage the MySQL server instance(s), because the MySQL Workbench has its limitations - you cannot configure everything with it.
3.2 Replication User
The next step is to create a user with replication permissions. Do not use an existing account because the account details will be stored in plain text in the master.info file and the account should be used only for slaves connecting to this master.
Create User
Start Navicat, and if you have not already done so, add a new connection to the master database server. Double-click the connection, then click the user-icon in the toolbar to list all users: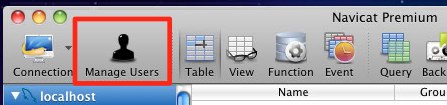
To add the new user, click the Add User-button in the toolbar at the bottom of the users window (the big + sign). We named the user replicator and gave it a good password. Since this user is restricted to a known IP-address, no-one can login from other IP-addresses.
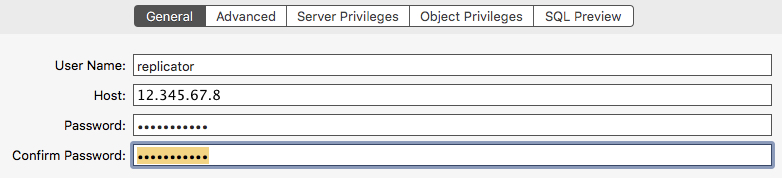
If you already know the IP-address or domain name of your slave server, enter that in the Host-field. If not, you can use a wildcard (%) character.
For example, enter the first 3 digits of the network the slave will be located in and add a .% to allow for any IP-address originating from that network, like 80.% or if you know more digits, add them to narrow down the possible clients: 80.187.%.
The moment you know the complete IP-address or domain name of the MySQL slave, you should come back here and change this into the complete IP-address of the slave.
Permissions
Select Server Privileges and check the following privileges: File and Replication Slave: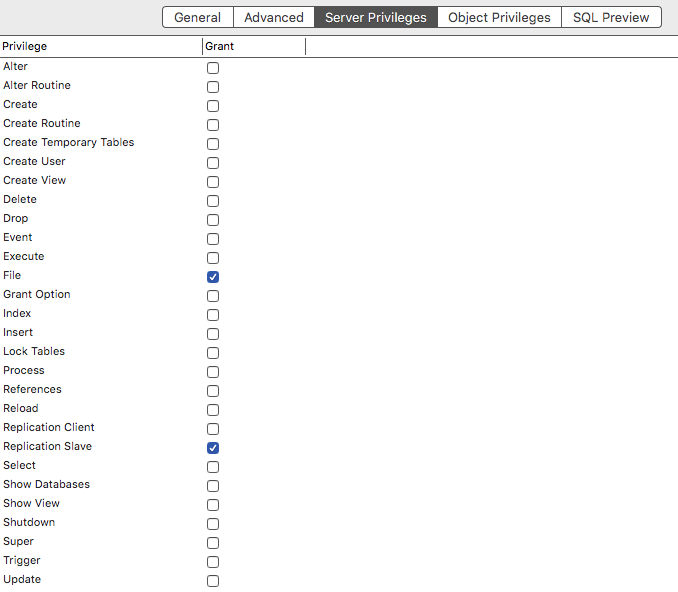
You can preview the SQL in the last tab.
CREATE USER 'replicator'@'12.345.67.8' IDENTIFIED BY 'aPASSword';
GRANT USAGE ON *.* TO 'replicator'@'12.345.67.8' IDENTIFIED BY 'aPASSword';
GRANT File, Replication Slave ON *.* TO `replicator`@`12.345.67.8`;
Click Save in the toolbar at the bottom to create the new user.
If you have not restarted MySQL since you modified the options file, do that now.
3.3 Binlog and position
With the binary log switched on, the slave must know where to pick up the transactions and start replicating. You can get the current position of the binlog as follows, in Terminal:
$ mysql -u root -p
Enter the correct password at the prompt and then enter the following command:
mysql> flush tables with read lock;
This will flush all tables and block write statements.
Important: Leave this session open and start a new Terminal session.
In the new session, log in to MySQL too and enter the following statement:
mysql> show master status;
This outputs a table that looks something like this:
+------------------+-----------+--------------+------------------+Both these columns contain values which are important for setting up the slave(s), so write these two values down because you need them later on.
| File | Position | Binlog_Do_DB | Binlog_Ignore_DB |
+------------------+-----------+--------------+------------------+
| mysql-bin.000161 | 710177030 | | |
+------------------+-----------+--------------+------------------+
1 row in set (0,00 sec)
Switch to the first Terminal session and enter the following commands:
mysql> unlock tables;
mysql> exit;
to release the lock and then exit the MySQL session. The master MySQL instance is now available for use again and while it runs, the bin-log position will of course change. Therefore, do not wait too long with setting up the slave.
4. Slave(s) Server(s) Setup
With the master configured and its bin-log position noted, it is time to configure and start the slave instance(s). Read here for a way to setup multiple MySQL instances on one server. If you do this, and I did, then the setup below is the same for both instances, apart from the mysql folder and port number. I have my second instance running: /private/var/mysql2 and port 3307.
4.1 Transfer Initial Data
First we make an exact copy of the master's databases we want to replicate onto the slave, so both master and slave initially have the same data.
Transfer the master's databases you want to replicate to the slave instance. You can do this in various ways:
- Using mysqldump and zip + ftp
- Zip the database itself + ftp (for myISAM tables; you might need to repair the tables after unzipping)
- Use Navicat (not good for tables with millions of records or blob data)
$ cd /var/mysql/ (or /var/lib/mysql/)
$ sudo zip -r ~/downloads/[database].zip [database]
Do this for each database that you want replicated. Then FTP all zip's to the slave server, also in your downloads folder for example.
To dump InnoDB tables, use these statements:
$ cd ~/Downloads
$ mysqldump --single-transaction --master-data --databases DATABASE1 DATABASE2 DATABASE3 -u root -p > mydatabases.sql
Zip and copy the file to the slave server.
Next, start a remote desktop or SSH session with the remote server and there, stop MySQL and start it again with the skip-slave-start option set to true (link ).
Then, in Terminal, enter the following commands to import the MyISAM databases:
$ cd /var/mysql (or /var/lib/mysql/)
$ sudo unzip ~/downloads/[database].zip
$ sudo chown -R _mysql:admin [database]
For the above chown, check first with ls -l if _mysql:admin are the right owners. Then do this for each unzipped database.
To import the InnoDB databases, unzip the transferred database dump file and enter the following commands:
$ cd ~/Downloads
$ mysql -u root -p < mydatabases.sql
Next, start Navicat and now you should see your new databases in the slave-connection. If not, you probably forgot to either do a Refresh Connection or the chown-command.
If you can access the tables and view data, good! If not, right click the table and choose Maintain->Repair Table->Quick or ->Extended and then try again.
4.2 Configure MySQL
If not still open, start a remote desktop session with the slave server and start MySQL Workbench there. Click Manage Security in the bottom right corner:
and from the popup-window, select the server instance you are going to use as the slave, which is probably localhost:
Click Options File under the Configuration-section in the side bar.
The options file is probably /etc/my.cnf. The settings that follow can also be directly entered in the options file, when you edit it on the command line.
In that case, note the hyphens and underscores used in the names of the MySQL options.
Logging
Select the Log Files-pane. Switch on the option log-bin by entering a name for the binary log, for example, mysql-bin.Scroll to Advanced log options and set expire_logs_days to 7.
/etc/my.cnf : log-bin = mysql-bin (link )
/etc/my.cnf : expire_log_days = 7 (link )
Replication settings
Select the Replication-pane.As with the master instance, here too you need to set a unique server ID. Check the option server-id and enter a unique number. I set it to 11.
/etc/my.cnf : server-id = 11 (link )
In General slave, switch log-slave-updates on and set slave_transaction_retries to 10.
/etc/my.cnf : log-slave-updates = 1 (link )
/etc/my.cnf : slave_transaction_retries = 20 (link )
In Slave replication objects, switch on replicate-do-db and enter all database names you want replicated, separated by a semicolon and no spaces before or after the semicolon! And no semicolon after the last entry. For example, customers;orders;orderlines
If you enter them directly into /etc/my.cnf, then use one replicate-do-db per database, each one on a new line:
/etc/my.cnf :
replicate-do-db = database1
. . .
replicate-do-db = databaseX
Note: only databases that are in the master's binary log can be replicated.
In Slave Identification, switch report-host on and enter the IP-address or the hostname of the slave. I prefer to use IP-addresses because then you do not have to worry about slow or unreachable DNS-servers, which, in my experience, quite often happens inside corporate networks. If your slave instance runs on a non-standard port, switch on report-port and enter the port number the slave listens to.
/etc/my.cnf : report-host = 12.345.67.8 (link )
/etc/my.cnf : report-port = 3307 (link )
And last, in Relay Log, switch on relay_log_purge.
/etc/my.cnf : relay-log-purge = 1 (link ).
Save the settings, quit MySQL Workbench, open a Terminal session and log into a MySQL slave-instance with the following command:
$ mysql -u root -p --protocol=TCP [--port=port of another instance]
You must use TCP, otherwise it doesn't work (link ).
Then, enter the following commands, but replace the text in italics with the obtained data from the master:
$ change master to
master_host='<IP-address or domain name>',
master_user='replicator',
master_password='<password>',
master_port=3306,
master_log_file='<binary log file name (incl. sequence number)>',
master_log_pos=<position>;
Replace <binary log file name> and <position> with the values obtained while setting up the master.
When you get a Query ok message, you're good. If not, make sure there's a working connection between the two servers.
Then restart MySQL.
If you previously have configured an instance as a slave (for testing purposes, for example) and are reconfiguring the instance, edit the files master.info and relay-log.info and enter the correct data:
$ cd /private/var/mysql
$ sudo vi master.info
14
mysql-bin.000162
391030594
192.168.1.200
replicator
password
3306
60
0
$ sudo vi relay-log.info
./FCSPR1-relay-bin.000038
4136037
mysql-bin.000162
391030594
4
$
Do not remove those empty lines inside these files!
5. Ready, Set, Go!
If the master is not already running normally, now is the time to release all locks and start it. Then, switch to the slave-server, start a Terminal session, log into MySQL and start the slave:
mysql> start slave;
The replication should now work. Check this by using the command:
mysql> show slave status;
+----------------------------------+--------------+-------------+-------------+---------------+------------------+---------------------+-------------------------+---------------+-----------------------+------------------+-------------------+----------------------------------------+---------------------+--------------------+------------------------+-------------------------+-----------------------------+------------+------------+--------------+---------------------+-----------------+-----------------+----------------+---------------+--------------------+--------------------+--------------------+-----------------+-------------------+----------------+-----------------------+
| Slave_IO_State | Master_Host | Master_User | Master_Port | Connect_Retry | Master_Log_File | Read_Master_Log_Pos | Relay_Log_File | Relay_Log_Pos | Relay_Master_Log_File | Slave_IO_Running | Slave_SQL_Running | Replicate_Do_DB | Replicate_Ignore_DB | Replicate_Do_Table | Replicate_Ignore_Table | Replicate_Wild_Do_Table | Replicate_Wild_Ignore_Table | Last_Errno | Last_Error | Skip_Counter | Exec_Master_Log_Pos | Relay_Log_Space | Until_Condition | Until_Log_File | Until_Log_Pos | Master_SSL_Allowed | Master_SSL_CA_File | Master_SSL_CA_Path | Master_SSL_Cert | Master_SSL_Cipher | Master_SSL_Key | Seconds_Behind_Master |
+----------------------------------+--------------+-------------+-------------+---------------+------------------+---------------------+-------------------------+---------------+-----------------------+------------------+-------------------+----------------------------------------+---------------------+--------------------+------------------------+-------------------------+-----------------------------+------------+------------+--------------+---------------------+-----------------+-----------------+----------------+---------------+--------------------+--------------------+--------------------+-----------------+-------------------+----------------+-----------------------+
| Waiting for master to send event | 192.168.1.200 | replicator | 3306 | 60 | mysql-bin.000162 | 392027903 | FCSPR1-relay-bin.000038 | 5133346 | mysql-bin.000162 | Yes | Yes | db1,db2,db3,db4,db5 | | | | | db5.REP% | 0 | | 0 | 392027903 | 5133346 | None | | 0 | No | | | | | | 0 |
+----------------------------------+--------------+-------------+-------------+---------------+------------------+---------------------+-------------------------+---------------+-----------------------+------------------+-------------------+----------------------------------------+---------------------+--------------------+------------------------+-------------------------+-----------------------------+------------+------------+--------------+---------------------+-----------------+-----------------+----------------+---------------+--------------------+--------------------+--------------------+-----------------+-------------------+----------------+-----------------------+
1 row in set (0,00 sec)
Check if Slave_IO_State has a sensible value, Slave_IO_running = yes and Slave_SQL_running = yes.
Since I started the MySQL slave server with the option skip-slave-start, I should now reset this situation. Thus I shutdown MySQL, removed this option from /etc/my.cnf and started MySQL again.
If you need to edit any settings in the slave's configuration at a later moment, make sure you stop your replication process first by using the command:
mysql> stop slave;
Tested: the setup even survives a sudo reboot -q on the master server. After that, you can follow the Seconds_Behind_Master counting down.
6. Failures
Sometimes the replication simply stops, because thing have been done to the backup database, or whatever.
If you first notice this after a somewhat longer period, the slave might not want to start. In such a case, you can do the following:
mysql> reset slave;
After that you can start the slave, and it wil halt again at the first error it encounters while processing the backlog.
To skip these errors until the slave is up-to-date with the master, you repeatedly execute the following commands:
mysql> stop slave; SET GLOBAL SQL_SLAVE_SKIP_COUNTER=100; START SLAVE;
After each 'start slave', check the log if you need to execute the commands again.
7. Interesting links
https://dev.mysql.com/doc/refman/5.7/en/show-binary-logs.html
https://dev.mysql.com/doc/refman/5.7/en/mysqlbinlog.html
$ mysqlbinlog --start-datetime="2017-05-13 10:00:00" --stop-datetime="2017-05-13 18:00:00" --base64-output=AUTO --verbose /usr/local/mysql/data/mysql-bin.000007
https://dev.mysql.com/doc/refman/5.7/en/show-binlog-events.html
mysql> show binlog events in 'mysql-bin.000006' from 154 limit 10;
https://dev.mysql.com/doc/refman/5.7/en/show-relaylog-events.html
mysql> show relaylog events in 'ns5-relay-bin.000005' from 154 limit 10;