Software development, photography, jokes, ....

noyb-logo

Sites by me

 
sds82-logo
tas-logoTransportation Administration System
snoezelkussen-logo-kleinstSnoezelen Pillows for Dementia
ikzoekeenbegeleider-logoBegeleiders voor gehandicapten
Laat uw hond het jaarlijkse vuurwerk overwinnen
Betuweroute en Kunst
logo 50x50Hey Vos! Je eigen naam@vos.net emailadres?
Kunst in huis? Nicole Karrèr maakt echt bijzonder mooie dingen
nettylogo2Kunst in huis? Netty Franssen maakt ook bijzonder mooie dingen

Hosting Favorites

 
ANU Internet Services
Netim
GoDaddy
XEL Media

Blogroll

 
Bomenstichting
Google Translate
PHP
MySQL
jQuery
jQuery UI
YourHead Stacks API
Favicon Generator.
Password Generator.
Check HTTPS problems


Marc's Place


 Connect your Mac to the TOR Network

  Browse and download anonymously
tor-logo


Buy me a cocoa

1

Stacks Image 19
What is TOR? Read all about it on the Torproject.org website. When you have done that, and you want to get connected, download the Tor Browser for Mac bundle.

When you unzip the download, you get an application named TorBrowser_en-US, so I renamed it to TorNetwork.

2

The next step is to run it. As it starts, it begins with an application called Vidalia which sets up a tunnel to the Tor Network. Next, a browser is started - a Firefox derivate. It is important to always run this application this way first, when you want to connect. After we copied the settings from the TorBrowser, we can quit it. Vidalia will stay open until you quit it.

3

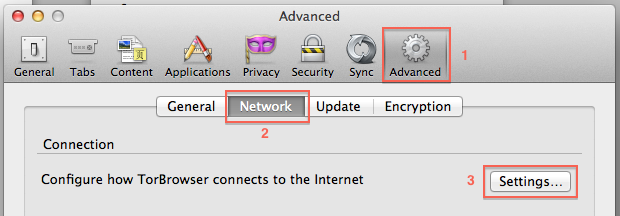
When the TorBrowser says 'Congratulations, you are now connected...', etc., then open the applications Preferences and click the 'Advanced' (1) cogwheel-button at the right of the toolbar. Then select 'Network' (2) from the list of tabs and then click 'Settings' (3).
Stacks Image 26
Stacks Image 30

4

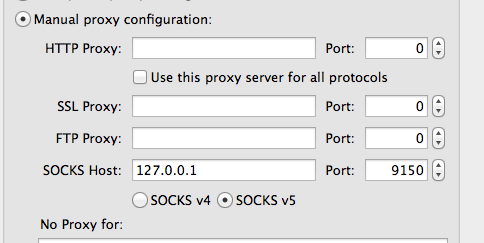
In the 'Settings' pane, you see that the Tor Browser is configured with a manual proxy configuration. Now you already know where this is going... Note the IP-address (which is the loopback address of your own Mac) and the port.

Important: do not copy the port number you see here. It differs on every Mac and even may differ every time you reconnect to the Tor Network.
Stacks Image 35

5

Stacks Image 44
You can now quit the Tor Browser, but leave Vidalia running - that is your gateway to the Tor Network.

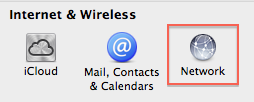
The next step is to choose 'System Preferences' from the Apple-manu and choose 'Network'

6

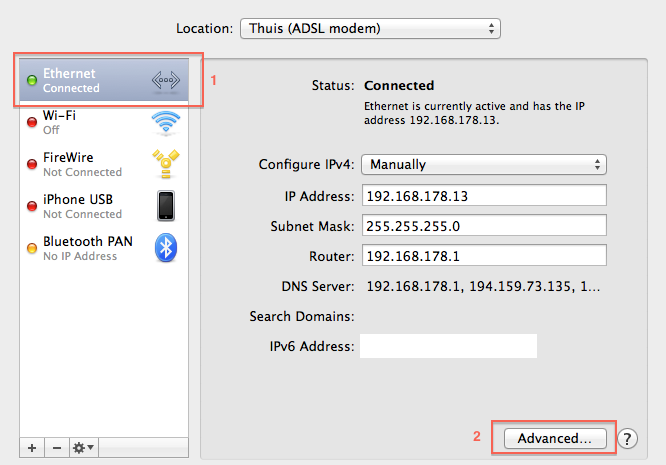
Choose your active network connection (1) and click 'Advanced...' (2)
Stacks Image 46

7

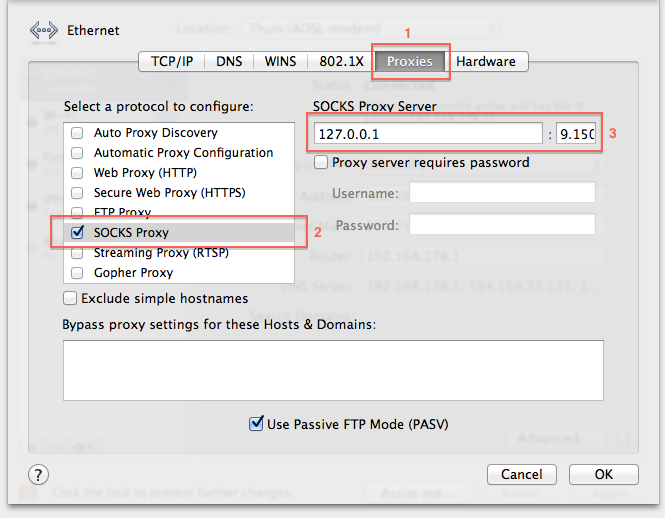
When you have that, choose the 'Proxies'-tab (1), check the 'SOCKS Proxy' (2) from the list and enter the IP-address and port number (3) which you noted earlier from the network settings from the Tor Browser.
Stacks Image 52

Click 'OK' and then click 'Apply'.


Now all your Mac's internet traffic is routed via the Tor Network - you can use any browser, any torrent-client, it does not matter.

It is of course all a bit slower than normal, but hey, with today's (semi)-governmental internet-censorships and other restrictions, which are really big nuisances, one is likely to accept some smaller nuisances like a slower connection.

If you are done and want your regular internet connection back, simply quit Vidalia and uncheck the 'SOCKS Proxy' in the 'Network'-system preference. And when you want to reconnect, start again at step 2.


buy me something-2
© 1997- Marc Vos (and others)   -   Privacy Statement   -    Contact Me

On this website, Google Analytics is used to track visitor statistics. These are anonymised data about the number of visitors, which pages they visit on this site, from which regions they visit, which web browsers they use, etc.. You will also see non-personalised ads via Google AdSense. Cookies from Paddle or Paypal are placed when you click on a 'Buy now!' or 'Donate!' button, and possible cookies from Disqus when you use that system to comment on one or more blogposts.
Privacy Statement