
 Betuweroute en Kunst
 Kunst in huis? Netty Franssen maakt ook bijzonder mooie dingen
Set up an XserveSet up an Xserve from scratch part I |
I had an iMac G5 2GHz acting as a server at my home-office, behind a ADSL router.

We decided that a server, co-located at my ISP's computer centre, was a better and more reliable solution because the internet connection and power supply for households is always less reliable and not that fast then those for an ISP. So we ordered an Xserve G5 with OS X Server 10.4.
Tweet

Now I was ready...
But before pressing power buttons, I thought it would be good to read the manuals that came with the Xserve. Well, I read them 3 times and still didn't know where to start. It's all If you are going..... If you have .... If, if, if. Really very, very confusing manuals. Nowhere a 'do-not-think-just-follow-these-steps' manual to get you started. So I decided to just go ahead and see.
I pressed the power button of the Xserve and man... what a noise. Luckily it's going to my ISP's computer room. I waited a little and then started '/Applications/Server/
After the last configuration screen, it dropped a shaded window saying my Xserve was being configured. Eight (yes 8) hours later it still was... hmmmmm?
It was obvious that something was going wrong, but I could nowhere see what it was or what it could be. Maybe the server waited for input? But hey, there's no video card in it? So what else could I do but break off the process and dive into the manuals again to find out how to reinstall the system software and in such a way that I can control it visually.
Since I do not want to spend 299 (€ / $) on Apple's Remote Desktop client (which is not a part of the Xserve deal - buh!) and I did not want to invest in a PCI-X video card (which is also not a part of the Xserve deal - a second buh!), the only way was option 3: target-disk mode.
So here we go!
What you need:
- An Apple Xserve which will not let you configure it properly.
- A second Apple Mac running OS X 10.4, capable of reading DVD's.
- A firewire cable that is long enough to connect the Xserve and your Mac.
- A live internet connection.
- Ear protectors against the Xserve's fan/hd noise, when in target-disk mode.
- A VNC client: Chicken of the VNC from SourceForge.
- Enough time and patience.
2. Connect the firewire cable to the Xserve and to your Mac. I used the 400 port at the front of the Xserve because that matches the 400 port on my Powerbook.
3. Put the Xserve in target-disk mode. How-to is described on page 63 in the Xserve G5 User's Guide.
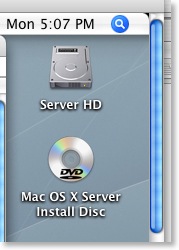
4. If your client Mac is not on, start it up and login. If you did what the manual said, the Xserve's internal harddisk, 'Server HD', should be visible on your desktop.
5. Insert the 'Xserve Install DVD' into your client Mac, not in the Xserve. Double-click the installer icon and press the 'Restart...' button when the installer asks you to (don't worry, it won't install OS X Server on your Mac after your Mac restarts).
6. When your computer has restarted fom the DVD, follow the installer until you reach 'Select destination...'. Now do this:
- Select the Xserve's disk 'Server HD' as the destination.
- Click the 'Options...' button and select the 'Erase and install' option.
Go ahead with the installation.
7. When the installer is finished, your computer restarts and will startup from the 'Server HD'. The 'Server Assistant' is started automatically. Just follow its instructions and when it has finished, 'Server Assistant' should restart your client Mac. If it doesn't, restart it yourself.
8. Your client Mac should again startup with OS X Server from the 'Server HD'. If not, log in and go to 'System Preferences -> Startup Disk' and choose the 'Server HD' as the startup disk and click 'Restart...'
9. When your Mac has finally started up in OS X Server, you should now get the login window. Log in as the administrator:
- Username : enter the username you had to provide during the configuration from 'Server Assistant', or type 'root'.
- Password : the same password as you provided during the configuration process of 'Server Assistant'. This password works for both usernames.
10. Go to 'System Preferences -> Sharing -> Remote Desktop' and switch it on if it is not already.
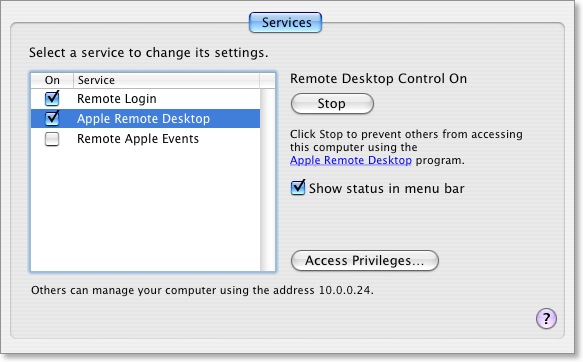
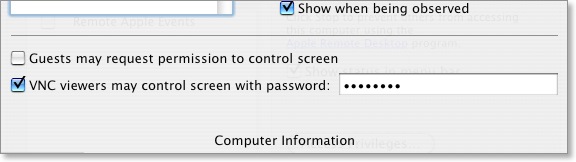
Click on the button 'Access privileges...' on the right and a window pops up. Your name appears there in the list. If you're not checked, check your name and grant it all privileges you will allow yourself over a remote connection. Very important : also check 'VNC viewers may control screen with password:' and enter an obscure password which can't be guessed by other people or computers.
Click OK and close the 'System Preferences'.
11. Shut down your client Mac. When that is done, press the power button on the Xserve. It should power-off immediately because it was only acting as an external firewire harddisk.
12. Remove the firewire cable.
13. Turn on both your Mac and the Xserve. Get a drink while these two startup.
14. Login on your Mac and start '
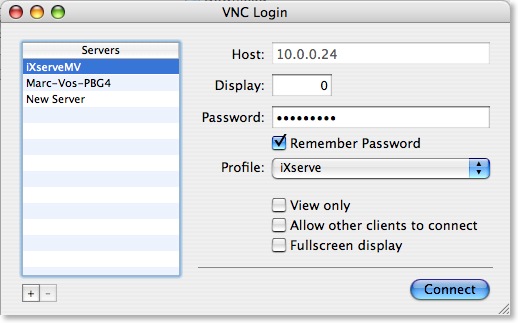
Select it and type the obscure password you set for VNC connections and click the 'Connect...' button. The OS X login window should appear in a VNC window.
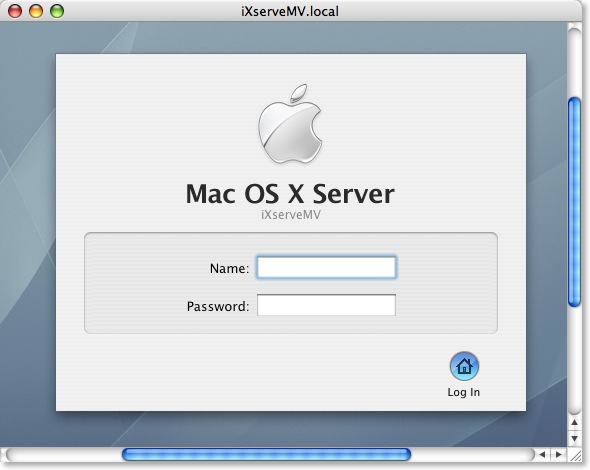
Sigh... at last we get some grip on the situation.
15. Log in with the username and password you provided during 'Server Assistant' (also see point 9). When 'Software Update' pops up, quit it. We're not ready for that yet.
16. What follows next is very, very important!
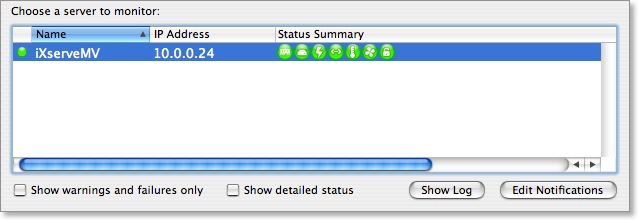
Because you installed OS X Server using another Mac, the installer did not install any Xserve specific software. That's why, for example, 'Server Monitor' cannot find the Xserve or keeps saying 'Waiting for response...'.
We have to install this software by hand
17. Insert the 'Xserve Installer DVD' into the optical drive of the Xserve. Its icon should appear on the desktop inside the VNC window and a window opens.
Click in this window to make it active and press command-2 (View->As List).
18. Click the arrow left of the folder called 'System'. Two subfolders appear: Installation and Library.

19. Click the arrow left of the folder called 'Installation'. Two subfolders appear: CDIS and Packages.

20. Click the arrow left of the folder called 'Packages'. Scroll down until you see 'ServerEssentials.pkg'.

Double-click it to start installation. When the installer is finished, it will eject the CD and you must restart the Xserve by choosing 'Restart...' from the Apple-menu inside the VNC window. The VNC connection will teminate.
21. Wait a few minutes to let Xserve start and re-establish the VNC connection. Instead of the login window, you should see the 'Server Assistant', telling you the Xserve needs to be set up. That's very good!!!
22. Step through the 'Server Assistant' and you'll notice that most of it will be retrieved from the already installed OS X Server. Very handy, you don't have to type or click much. You can make configuration changes if you want to.
23. When 'Server Assistant' is finished, your Xserve should restart. If not, restart it yourself.
24. When the Xserve is up again, it should be visible in 'Server Monitor'.
25. Re-establish the VNC connection; log in and choose 'Software Update...' from the Apple menu and install the available updates.
Well, that's it basically. Now that you have a visible connection, you can mount shares and copy data and install other software from other Macs to your Xserve.
The next step is activating / installing the latest MySQL database server.