Install CentOS 8 / Stream in Parallels Desktop #centos #parallels #macos
Wed, Nov 17 2021, 18:41 Linux, Mac, macOS, networking, server, Unix, Webserver Permalink |
I wrote a short how-to on how to create CentOS 8 VM in Parallels Desktop for Mac, for local development and testing.
Comments
Hardware crash VM and invalid backup #crash #hardware #raid #backup
Wed, Oct 02 2019, 23:12 Disk, hardware, Linux, Projectmanagement, server Permalink
Due to a hardware crash last night of the VM where my virtual server is, eh was, running on, and a backup that occurred to be invalid, some recent files and images are now gone forever, unless one of the two failing SSD's can be recovered tomorrow.
So if you want to download something, and the file the link is pointing to, is missing, let me know.
I am now trying to get as much as I have saved back online.
Sorry for the inconvenience.
- -
Marc
So if you want to download something, and the file the link is pointing to, is missing, let me know.
I am now trying to get as much as I have saved back online.
Sorry for the inconvenience.
- -
Marc
Setup your local macOS X web server #apache #macos #macosx #webserver #localhost #webdevelopment
Sun, Jun 24 2018, 09:55 Apple, Mac OS X, networking, PHP, programming, server, Unix, Webserver PermalinkI've put together a page where I describe how you can setup a web development environment with two or more Apple Macs.
If you are a web developer working on Apple Macs, you sure do want to use the macOS X built-in web server, Apache, on all your Macs. And you want to be able to access your Sites folder, local web documents folder and your other Mac via HTTP.
I'll describe how to set it up on macOS High Sierra (10.13.5). If you're on a previous version of macOS X, not to worry, the steps to take are practically identical. Read on ...
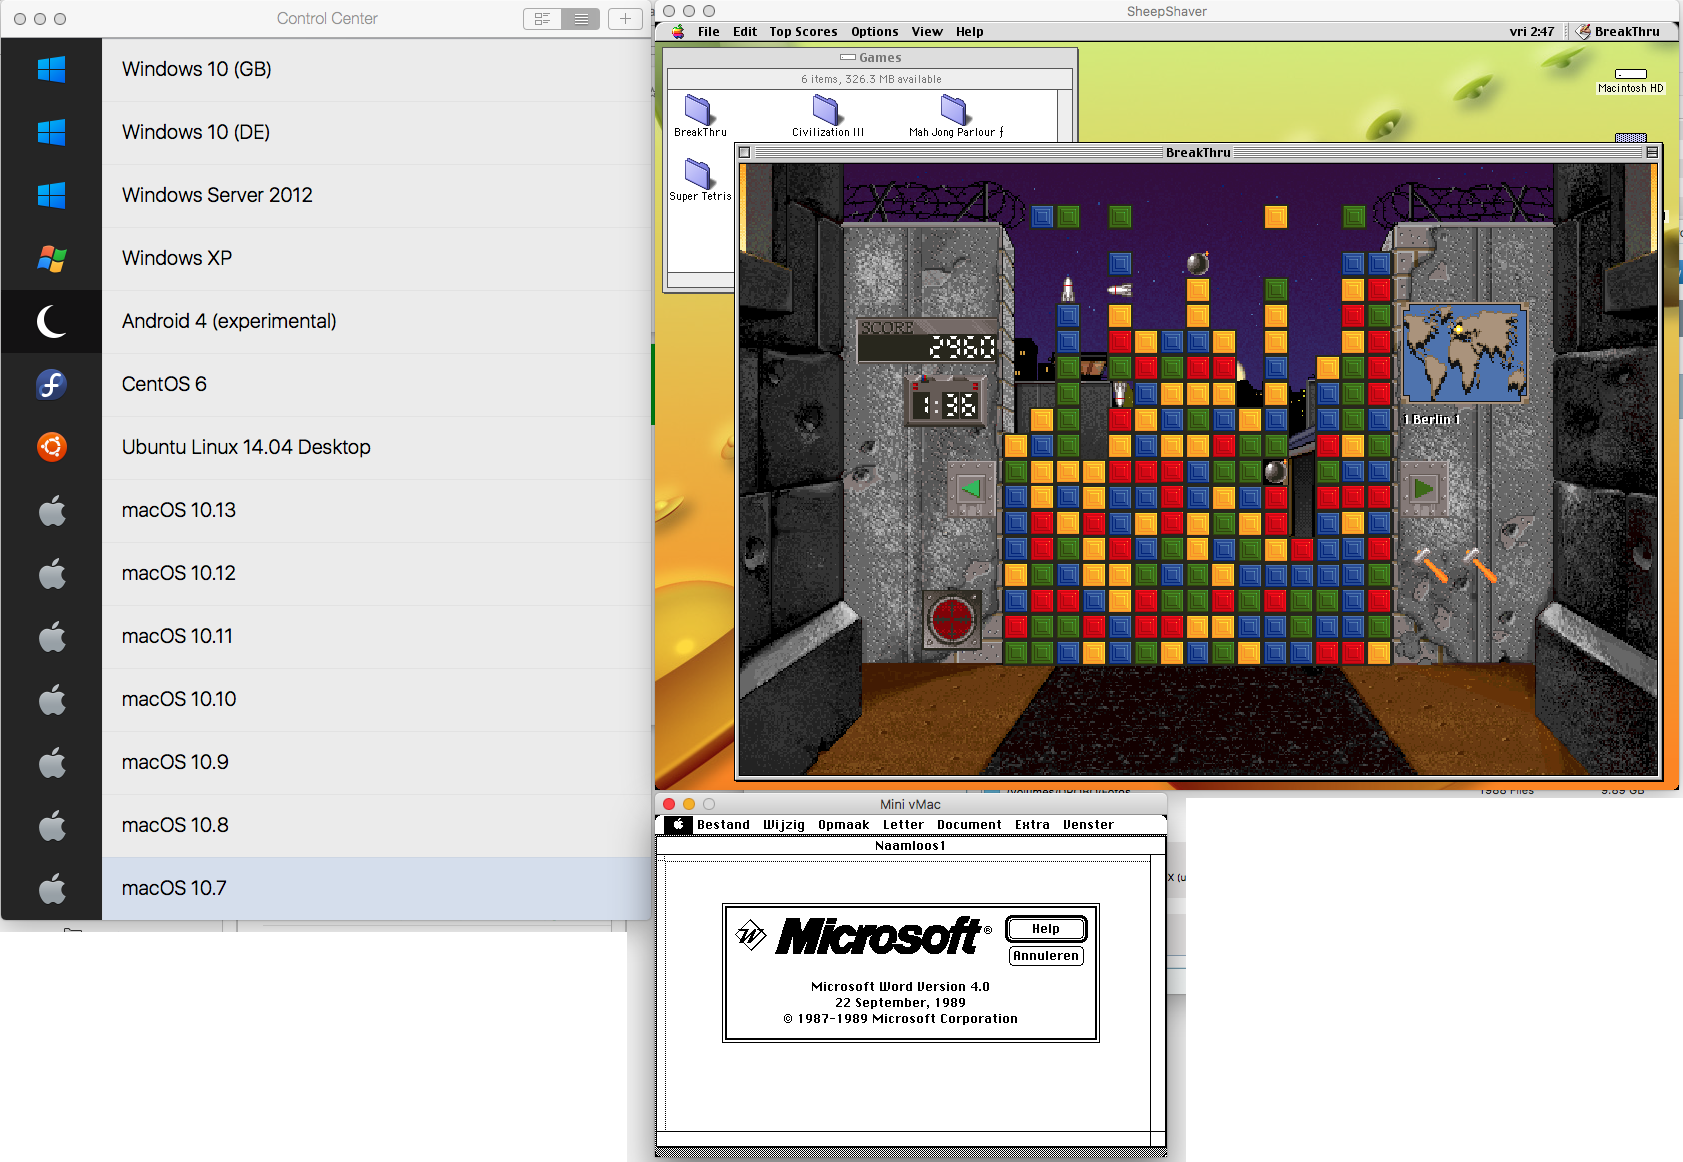
I love the invention of virtualization
Fri, Mar 30 2018, 11:09 Apple, Mac OS X, server, software, Unix, Windows Permalink[Repair] MySQL Upgrade on Mac OS X
Tue, Jun 27 2017, 10:40 Apple, Database, Mac OS X, MySQL, server, Webserver PermalinkSome time ago I did a MySQL upgrade without thinking ... that was not funny. So I retraced what I did to get the new version up and running and wrote it down as a sequence of steps to follow, when I need to upgrade to the next higher version.
I published these steps on the page [Repair] MySQL Upgrade (Mac OS X) , so they might be of help to you too.
I published these steps on the page [Repair] MySQL Upgrade (Mac OS X) , so they might be of help to you too.
Apache vhost sort order on CentOS
Fri, Oct 23 2015, 11:33 Linux, server, Unix, Webserver PermalinkI’ve written a page on how to control the order of Apache vhosts [on CentOS]. Just for reference.
ProFTPD with MySQL backend
Fri, Jul 18 2014, 16:23 FTP, Linux, MySQL, server, Unix PermalinkI know there are already many pages about ProFTPD and MySQL, but all info I needed was scattered over the Internet.
Therefore I collected all info I needed and put into one page: Setup ProFTPD and MySQL.
Therefore I collected all info I needed and put into one page: Setup ProFTPD and MySQL.
Allow LoginWindow only for some users on Mac OS X Server
Mon, Apr 21 2014, 16:40 Apple, Mac OS X, server PermalinkLooking for the way to disallow regular users to login via VNC or Apple Remote Desktop?
- Open Server Admin in /Applications/Server/
- Connect to and select your server.
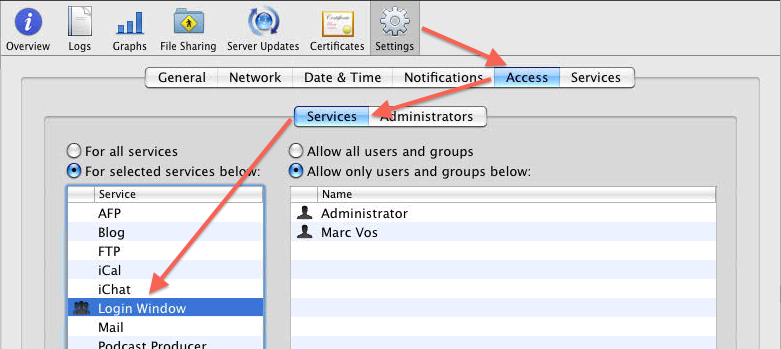
- 10.5 Server: select Settings -> Access
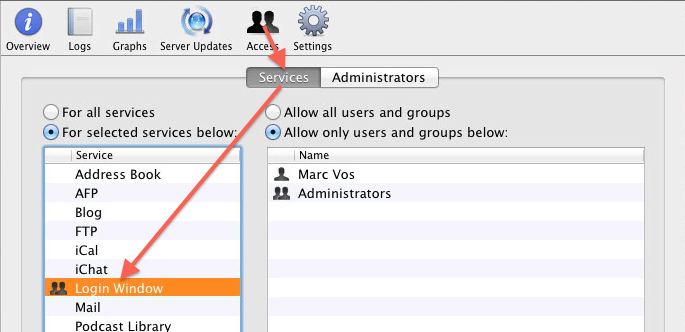
- 10.7 Server: select Access
- Then select Services -> For selected services below -> Login Window.
- Then select Allow only users and groups below on the right, and add yourself and whoever else you want to grant access.
10.5 Server:

10.7 Server:

I have no idea if this method is still present in 10.8 or 10.9 server.
- Open Server Admin in /Applications/Server/
- Connect to and select your server.
- 10.5 Server: select Settings -> Access
- 10.7 Server: select Access
- Then select Services -> For selected services below -> Login Window.
- Then select Allow only users and groups below on the right, and add yourself and whoever else you want to grant access.
10.5 Server:

10.7 Server:

I have no idea if this method is still present in 10.8 or 10.9 server.
Daily Script on Mac OS X Server did not clean up /tmp
Wed, Oct 31 2012, 18:27 Apple, Mac OS X, server, Unix PermalinkLately my /tmp folder was piling up with files (krb5cc*) without any signals that these files were regularly deleted. A bit of googling showed that these come from the Open Directory Server, but that's something I cannot control. So I went to investigate why the daily script would not delete them. I googled a bit again and found out where the parameter file for the daily, weekly and monthly cleanup-scripts is located: /etc/defaults/periodic.conf. There, I found these settings for /tmp :
# 110.clean-tmps
daily_clean_tmps_enable="YES" # Delete stuff daily
daily_clean_tmps_dirs="/tmp" # Delete under here
daily_clean_tmps_days="3" # If not accessed for
daily_clean_tmps_ignore=".X*-lock .X11-unix .ICE-unix .font-unix .XIM-unix"
daily_clean_tmps_ignore="$daily_clean_tmps_ignore quota.user quota.group"
# Don't delete these
daily_clean_tmps_verbose="YES" # Mention files deleted
The one to look for is where it says "3". This indicates that the routine should clean up old files not accessed for 3 days. But it did not - and the files were not mentioned in the ignore-parameters. Even rm -rf krb5cc* returned immediately an error that its argument list was too long. Therefore I started reading what the exact values for this parameter should be.
Well, it turns out that the value needs a qualification, like d(ays) or m(months), etc.. I found that out by reading /etc/periodic/daily/110.clean-tmps and studying how find uses -atime, -ctime and -mtime and how to add or subtract values. Here are a few find-commands, copied from /etc/periodic/daily/110.clean-tmps, which I tried to make sure that what I just read was right:
$ cd /tmp
$ sudo find -dx . -fstype local -type f -atime +1h -mtime +1h -ctime +1h
$ sudo find -dx . -fstype local -type f -atime +1d -mtime +1d -ctime +1d
$ sudo find -dx . -fstype local -type f -atime +2d -mtime +2d -ctime +2d
Further reading suggested to use override-files, so I sudo'd into vi to create the file /etc/periodic.conf with the following contents:
daily_clean_tmps_days="2d"
Yes, 2 days. Three days is too long for a server, in my opinion. The file's attributes look like this:
marcvos @ ~ $ ls -l /etc/periodic.conf
-rw-r--r-- 1 root wheel 27 Oct 25 16:38 /etc/periodic.conf
Next, delete the file daily.out:
$ sudo rm /var/log/daily.out
Reboot the server. Check your /tmp folder and /var/log/daily.out the next days.
With me, I now finally saw all those files getting deleted.
iperf3: a Network Bandwidth Tester
Thu, Apr 21 2011, 13:06 networking, server, software PermalinkI was investigating my WiFi access points for improvement and while browsing the web for ideas I came across iperf3. Simple and effective, iperf3 is a tool to measure network bandwidth (read more about it ...)
To simplify installation, I created a MacOS X (Intel) installer package for iperf3 so you do not need to compile yourself.
(download iperf3.pkg)
An Universal Binary Installer Package for MacOS X can be found on NCSA Illinois, although that is iperf2.
(download iperf.pkg)
Simple 1-2-3 Network test:
Install iperf3 on a Mac where you start it as a server: open Terminal and enter the following:
iperf3 -s
Then install it on another Mac and run it as a client: open Terminal and enter:
iperf3 -c 192.168.178.131 -t 60 -P 2
where you must replace this IP-address with yours where iperf3 runs as a server on.
Wait a minute (-t 60) and the results are presented as follows:
Connecting to host 192.168.178.131, port 5201
[ 4] local 192.168.178.13 port 65334 connected to 192.168.178.131 port 5201
[ 5] local 192.168.178.13 port 65335 connected to 192.168.178.131 port 5201
[ ID] Interval Transfer Bandwidth
Sent
[ 4] 0.00-60.00 sec 342 MBytes 47.8 Mbits/sec
Received
[ 4] 0.00-60.00 sec 342 MBytes 47.8 Mbits/sec
Sent
[ 5] 0.00-60.00 sec 321 MBytes 44.9 Mbits/sec
Received
[ 5] 0.00-60.00 sec 321 MBytes 44.9 Mbits/sec
Total sent
[SUM] 0.00-60.00 sec 663 MBytes 92.7 Mbits/sec
Total received
[SUM] 0.00-60.00 sec 663 MBytes 92.7 Mbits/sec
iperf Done.
To stop the server, press CTRL-C.
Enter iperf3 --help for all possible options.
This suite is also available on iOS: WiFi Bench.


 Transportation Administration System
 Snoezelen Pillows for Dementia
 Begeleiders voor gehandicapten
 Laat uw hond het jaarlijkse vuurwerk overwinnen
 Betuweroute en Kunst
 Hey Vos! Je eigen naam@vos.net emailadres?
 Kunst in huis? Nicole Karrèr maakt echt bijzonder mooie dingen
 Kunst in huis? Netty Franssen maakt ook bijzonder mooie dingen
