
 Betuweroute en Kunst
 Kunst in huis? Netty Franssen maakt ook bijzonder mooie dingen
Install CentOS 8 / Stream in Parallels Desktop
The following are instructions to help you to create a CentOS 8 virtual machine in Parallels Desktop for Mac.
Tweet

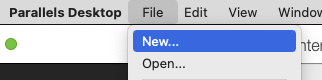
1. Create the CentOS VM
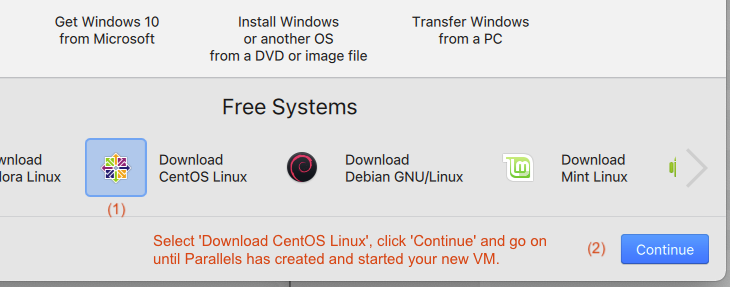
Step 1:
Step 2:
2. Bridge Networking Mode
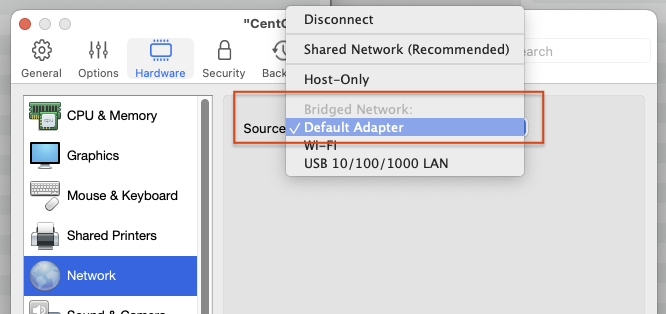
To have the new CentOS VM act as a server inside your local network, put it Bridged Networking Mode :
1) Shutdown the VM
2) Choose Configuration -> Hardware -> Network -> Bridged Network -> Default Adapter
3. Activate Apache Web Server
Apache comes pre-installed, you only have to activate it:
# systemctl [start|stop|restart|reload|status] httpd
$ sudo systemctl start httpd
# Start at boot
$ sudo systemctl enable httpd
4. Allow HTTP(S) Traffic
Since I could not reach the web server from my other local devices, I've searched the web for a solution. It took a few hours, I collected info from lots of places, until finally I got it together. You need to perform the following steps, otherwise you won't be able to serve web pages in your local network and PHP's file_get_contents(), stream_get_contents(), etc. will not work:
$ sudo firewall-cmd --permanent --add-service=http
$ sudo firewall-cmd --permanent --add-service=https
$ sudo firewall-cmd --reload
$ sudo setsebool -P httpd_can_network_connect 1
5. Install PHP 8
I installed PHP 8 to test my PHP applications with, because I am still running PHP 7.4. With so many customers, and so many applications, I find it dangerous to jump versions in the tempo the PHP group suddenly seems to find necessary.
$ sudo dnf -y install https://dl.fedoraproject.org/pub/epel/epel-release-latest-8.noarch.rpm
$ sudo dnf -y install https://rpms.remirepo.net/enterprise/remi-release-8.rpm
$ sudo dnf -y install yum-utils
$ sudo dnf module reset php
$ sudo dnf module install php:remi-8.0 -y
$ sudo dnf install php -y
To install additional modules, do this:
$ sudo dnf -y install php-{cli,fpm,mysqlnd,zip,devel,gd,mbstring,curl,xml,pear,bcmath,json}
To see, which modules are installed, type:
$ php -m
[PHP Modules]
bcmath
bz2
calendar
Core
ctype
curl
date
dom
exif
fileinfo
filter
ftp
gd
gettext
hash
iconv
json
libxml
mbstring
mysqli
mysqlnd
openssl
pcntl
pcre
PDO
pdo_mysql
pdo_sqlite
Phar
readline
Reflection
session
SimpleXML
sockets
sodium
SPL
sqlite3
standard
tokenizer
xml
xmlreader
xmlwriter
xsl
Zend OPcache
zip
zlib
[Zend Modules]
Zend OPcache
6. Install MySQL
Install MySQL and make it available on your local network, so you can access it via MySQL Workbench, Navicat, or....
Normally, your local network IP-addresses begin with 192.168. If yours are different, set them in the below CREATE and GRANT commands.
$ sudo dnf install mysql-server
# sudo systemctl [start|stop|status] mysqld.service
$ sudo systemctl start mysqld.service
# Start at boot
$ sudo systemctl enable mysqld.service
# Open firewall for Navicat
$ sudo firewall-cmd --permanent --add-service=mysql
$ sudo firewall-cmd --reload
# Add root user for local network
$ mysql -u root
mysql> CREATE USER 'root'@'192.168.%' IDENTIFIED BY 'A-password';
mysql> GRANT USAGE ON *.* TO 'root'@'192.168.%';
mysql> exit
Open your database manager on your Mac and choose 'Add new connection', enter the VM's IP-address and username/password you just added, and click 'Connect'.
7. Enable the Web Console
The Web Console is ideal. It's not feature-packed as Webmin, but it does a good job and makes life easier:
# systemctl [start|stop|status] cockpit.socket
$ sudo systemctl start cockpit.socket
# Start at boot
$ sudo systemctl enable cockpit.socket
Now you can reach the console via the server's local domain name – if you set it up – or its IP-address:
or
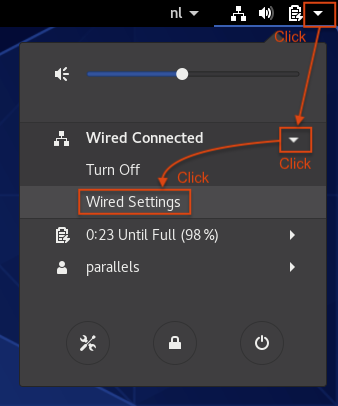
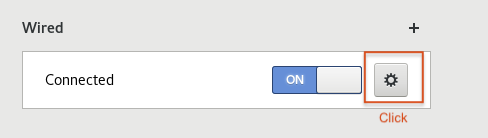
8. Modify DNS Settings
To access web sites locally from the CentOS 8 server and vice-versa, I modified the DNS settings. Since I use DNS-Enabler , I have the CentOS VM also point to that DNS-server first:
Step 1:
Step 2:
Step 3:
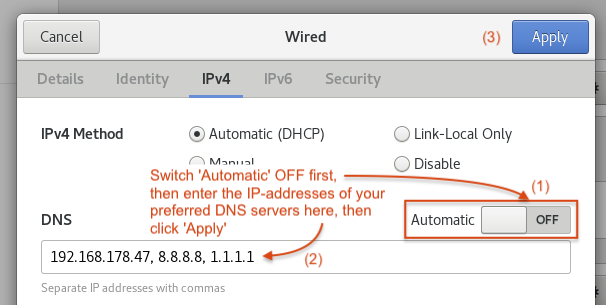
Step 4:

9. Perform System Updates
Big change it updates itself to CentOS Stream.
10. Reboot
If you end up with a black screen and a blinking underline-cursor, no worry, just keep on reading.
11. Black Screen after update to CentOS Stream
Since this was a new one for me too, I spent, here too, a few hours searching for a solution. Know that your VM is fully up and running at this point, it's not hanging or so.
And it turns out to be so simple. Most sites talk of CTRL + ALT + F1 or F2 to be able to login, but it was CTRL + ALT + F3. Or, I accidentally held down the CMD + Arrow left/right keys, and those also gave me a login prompt, even after logging in. You can open multiple sessions this way, and use the CMD + Arrow-keys to switch session.
After logging in with the pre-configured 'parallels'-user, with which you also login at the desktop, I could look at some things.
The hours spent, told me that there was a problem with the display-drivers. Just after I tweeted Parallels about my specific problem – the GLX-error was nowhere to be found in Google – I thought about reinstalling Parallels Tools. This can be done via the command line, too – and that worked.
So you have to do this, to get your desktop environment back:
$ sudo /usr/lib/parallels-tools/install
Answer all question with 'Next' and 'Install' – you can only do that by using the Enter-key. You can use the TAB-key to move through input fields and buttons.
At one point you are positioned in a dropdown menu; to get to the 'Next'-button, use the TAB-key.
It takes about 5 minutes, and then the 'Reboot' button appears and it is selected by default. Simply press Enter to reboot.
Now you'll have the normal desktop-login back.
You can set the right screen resolution only after logging in first.
Have fun with your new server!